Hi everyone! In this post, I will be talking about file duplication. Specifically, I will be going over the pros and cons of keeping copies of digital files, some tools you can use to uproot duplicates and end by illustrating how I was able to understand my checksum results a bit better.

Don’t let copies get the best of you!
Duplication: The Good
In digital preservation, copying and geographically dispersing a file across different locations is a strategy to safekeep digital assets for future use and access. As you can see in the “Levels of Preservation” guidelines put forth by the National Digital Stewardship Alliance (NDSA), having two complete, non-collocated copies of a file is one of the first steps an institution can take to improve their digital preservation activities. At their best, institutions would ideally keep at least three copies of a file in different places, all with different disaster threat policies in place.
A real-life example of this concept in action is LOCKSS (Lots of Copies Keep Stuff Safe) which employs networks of servers working together to ensure that if part of or an entire file is damaged, another server containing a copy of the file can be employed to recover it. This is a proven and effective model used today by university libraries to protect collections of electronic academic journals.
Duplication: The Bad & The Ugly
On the flipside, too much duplication can be a scourge and is also a very common issue throughout most if not all systems. In the case of a public radio station like NYPR, their servers contain hundreds of thousands of files, the majority of which are uncompressed, broadcast-quality audio or video files. Needless to say, a/v file duplicates end up taking up lots of space. This can cause all sorts of problems including (but not limited to):
- MONEY: Server space = $, so copies cost a lot to maintain.
- SPEED: Duplicates clog up space, slowing things down for everyone.
- FILE AUTHENTICITY: Some systems have the capacity to not just duplicate files, but triplicate, quadruplicate, and so forth, and unless a stop is placed on this behavior, authenticity of the original file can be hard to determine.
- COLLECTIONS MANAGEMENT: When faced with such large quantities of copies, figuring out what to delete is not an easy task. Tracking down the individual or department who can authorize what should and should not be kept can be arduous and time-consuming. In some cases, IT may need to get involved.
In light of this problem, IT, for lack of a better and more efficient solution, may decide to purchase additional storage, temporarily relieving server slowness and opening up space. However, this solution does not address the root cause of duplication. If anything, this is a band-aid solution that unfortunately enables “bad” duplication habits. This can otherwise compromise the mission and priorities of a digital archive so it is necessary that the archives and IT work together to come up with a more viable solution that does not just create more space for more duplicates.
Tools
There are a variety of tools and applications that can tell you what, if anything, is being copied across your system by performing a checksum analysis. Here at NYPR I employed the unlicensed, free version of TreeSize. Please note: checksums can take days if you are scanning a large quantity of files. In the case of TreeSize vs. the media folders here at NYPR, the entire process took almost 4 days to complete. While it was running, other programs on my computer slowed to a crawl. In retrospect, I wish I had waited for a long holiday weekend to kick off the scan.
There are a lot of other tools out there that you can use other than Treesize. Check out Ricky Erways “Walk this Way” report: pages 27-8 lists tools, software and resources that address duplication.
Beyond the Hash
Within smaller systems, finding and cleaning up duplicates may be as easy as running a checksum scan, deleting copies and calling it a day. Certainly this would work for my own desktop computer at home, which contains no more than a few thousand files: I’d say this would take me no more than an afternoon to complete. However, this type of approach simply does not work when reviewing an institutional checksum report that contains hundreds of thousands of instances of duplication, whose files are owned by dozens of staff members. At NYPR, files were being copied not just within folders but across entire file trees as well. In addition to that, some files were being copied dozens of times over within and between folders. I had to figure out a way to hone in on patterns of duplication behaviors from a sea of MD5 checksums.
Unfortunately, the TreeSize checksum report did not actually output the checksum hash in its own column! I was both frustrated and surprised by this, since it would have made sorting the results a lot easier (and this blog post a bit shorter). As a result I took it upon myself to manipulate the data somewhat crudely using Excel to assign keys to each duplicate batch. Yes, I could have downloaded and tried another checksum application that output a more thorough report, but instead I just went for it, partly because I am personally into tackling Excel conundrums. Also, I now know a lot more about the awe-inspiring powers of =IF and =FIND statements! Although, credit is certainly due to one of my cohort’s workshop instructors, Chris Sula (Assistant Professor and Digital Humanities Coordinator at Pratt and data viz guru), who showed me how =IF and =FIND functions can be used to normalize data in spreadsheets.
If you have taken on a similar data project at your institution, I would love to hear what approach you took. Otherwise, here are the steps I took on my end. Again, my approach was kind of crude, but at the end I ended up with a richer set of data.
Step 1. Run a checksum report in TreeSize and export the results to *.csv format. A checksum report, in short, assigns a unique digital fingerprint to a given block of data, such as a file. If one or more files shares the same checksum hash, they are grouped together by TreeSize as duplicates of one another. Even if two identical files have different filenames, the checksum scan can still determine they are the same file. Your results will probably look somewhat like this, although different checksum reports may vary:
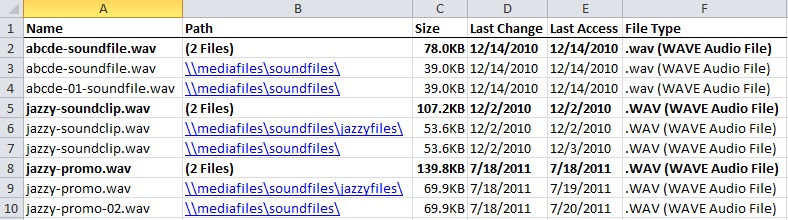
This is an example of the TreeSize MD5 checksum report in *.csv format, sans checksum hash. Note that the TreeSize results group together duplicates beneath bold headers. Sorting the spreadsheet will disrupt this order.
Step 2. Sort your data by the checksum hash and then by “Last Change” (or other date field) in ascending order so that each batch starts with the original file and ends with the last copy created. In my case, TreeSize did not actually output the checksum hash for each file. Here, I had to employ a =FIND statement to distinguish between headers and results. First, I I inserted a new column that I called “Header = 1, Result = 0”, then employed the following =FIND statement:
=FIND(“(“,C2,1))
This reads as: “See if the first character in cell C2 is an open parenthesis. If it is, return the value “1”.
After filling down the =FIND statement, I filtered by any results that did not return a 1 and manually filled those cells up with a 0.
The result on the spreadsheet looked like this: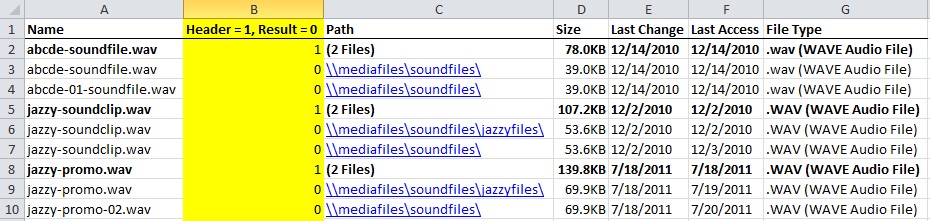
After identifying headers and results, I inserted a new column that I called “Key” and employed an =IF statement to assign unique, sequential IDs to each batch of headers and results, as follows:
=IF(C3>0,B2+1,B2)
This reads as: “If the value in cell C3 is greater than 0, take the value of cell B2 and increment its value by 1. Otherwise, if the value in cell C3 is equal to 0, keep the value the same as B2.” (Note: In this case I had to input a leader value manually into cell B2 (“1234”) and insert the =IF statement in cell B3 so the formula had somewhere to start.)
Without the “Key” column, any attempt to sort the spreadsheet would have dismantled each duplication batch instead of keeping them together (this is where my workshop teacher’s advice on =IF statements came in handy). Here is what the spreadsheet looked like with assigned keys:
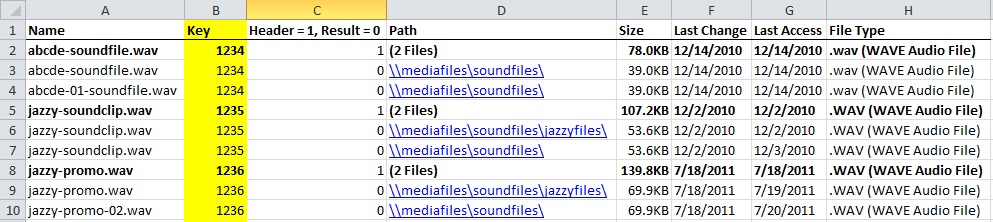
The new key inserted into column B using an =IF statement allowed me to sort the batches by ascending date, while keeping each batch of duplicates together.
Step 3. Here, I implemented another =IF statement to take the file path from column C, insert it into column D and concatenate it with the previous path, as follows:
=IF(B3=B2,CONCATENATE(D3,”>”,E3),D3)
This reads as: “If the key in cell B3 equals the key in B2 (the cell above it), concatenate the string in cell D3 (the value in the “Path” column) to the string in E3, using a “>” character to separate each path.”
Each path is separated by a “>” symbol so that they could be delimited, if needed, later on. The result: the last row of each batch in column D shows a “footprint” of where a file traveled within and across folders from creation to copy(ies). The resulting set of footprints could be sorted or de-duped in order to give an idea of patterns of where files were being copied.
The screen-cap below shows a common “footprint” between the last two batches: files created in \\mediafiles\soundfile\jazzyfiles\ are commonly copied into \\mediafiles\soundfiles\. When I applied this methodology to NYPR’s data, I discovered hundreds of similar footprints. Chaos into order! It’s a beautiful thing.

Step 4. I took the aggregation of footprints and reduced them to a basic set of folder groups where duplication was happening extensively within or between them.
Step 5. Armed with data, I could take my results and ask questions within specific departments or to IT and start to untangle some common duplication behaviors throughout the system.
Takeaways
Preventing redundancies from happening in the first place is the best practice, since duplication can run awry very quickly without rules in place. However, by the time some organizations get around to a checksum scan, they will already be knee-deep in the problem. The use of free and readily available tools and some know-how in data manipulation can help us grapple with understanding why and where copies are happening. From here, you can present data to key staff, like IT, and work with them to make adjustments in workflows that perpetuate systematic copying. In NYPR’s case, I discovered some duplication was happening because certain audio editing templates were set up to copy the same file over and over, instead of just referencing the original. Presenting spreadsheets with hundreds of thousands of rows is not an option, so the ability to pare down results into easy-to-digest bits like this can help focus institutional goals and increase efficiency.
Hi Mary! I enjoyed your post. It also features my favorite gif — printer cat!
Does NYPR have several locations to keep their copies safe?
Hi Christina! Glad you enjoyed the copy cat! And yes, indeed they do. Audio files are typically backed up off-site onto LTO tape. They also utilize cloud services for other files.